微信小程序上传照片
微信小程序上传照片功能教程
在微信小程序开发过冲中,上传图片是一个经常用到的功能。如果不使用一些公共的组件,想要在原生的 微信开发者工具 里面开发,需要我们单独的维护这样的功能。
代码结构
我们先到 ICON 上面下载两张图片,一张用来引导用户添加,一张用来引导用户删除。然后新建一个 page 页面,用来使用添加图片的功能。代码结构如下
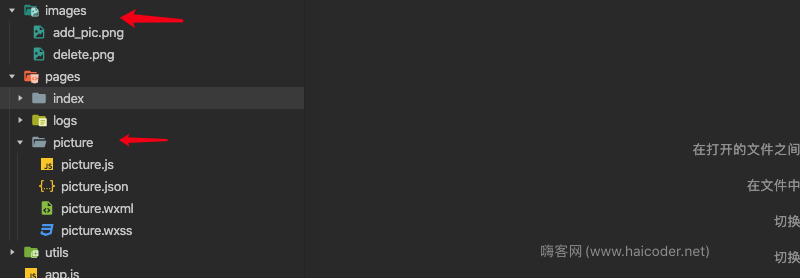
我们在和 pgaes 文件夹平级的目录创建了一个 images 文件夹,在里面将 添加图片和删除图片存放进去。然后新建了 picture 文件夹,里面存放引用页面。
案例
picture.wxml
<view class="imageList">
  <view class="img-li" wx:for="{{imgList}}" wx:key="index">
    <view data-index="{{index}}">
      <image class="uploading-icon" src="{{item}}">
        <image bindtap="deleteImg" class="delectImage" src="/images/delete.png"></image>
      </image>
    </view>
  </view>
  <view class="img-li" wx:if="{{imgList.length<=5}}" bindtap="chooseSource">
    <image class="uploading-icon" src="/images/add_pic.png"></image>
  </view>
</view>
picture.wxss
.imageList {
  display: flex;
  flex-wrap: wrap;
}
.img-li {
  margin-bottom: 20rpx;
  justify-content: space-between;
}
.img-li:nth-child(4) {
  margin-right: 0;
}
.img-li:first-child {
  margin-right: none;
}
.uploading-icon {
  width: 170rpx;
  margin-right: 30rpx;
  height: 170rpx;
  display: flex;
}
.delectImage {
  width: 40rpx;
  height: 40rpx;
  display: flex;
  z-index: 9;
}
picture.js
// pages/picture/picture.js
Page({
  /**
   * 页面的初始数据
   */
  data: {
    imgList: []
  },
  /**
   * 生命周期函数--监听页面加载
   */
  onLoad: function (options) {
  },
  // 点击调用手机相册/拍照
  chooseSource: function () {
    var _this = this;
    wx.showActionSheet({
      itemList: ["拍照", "从相册中选择"],
      itemColor: "#CED63A",
      success: function (res) {
        if (!res.cancel) {
          if (res.tapIndex == 0) {
            //拍照
            _this.imgWShow("camera")
          } else if (res.tapIndex == 1) {
            //相册
            _this.imgWShow("album")
          }
        }
      }
    })
  },
  imgWShow: function (type) {
    var _this = this;
    let len = 0;
    if (_this.data.imgList != null) {
      len = _this.data.imgList.length
    }
    wx.chooseImage({
      //最多还能上传的图片数,这里最多可以上传5张
      count: 6 - len,
      //可以指定是原图还是压缩图,默认二者都有
      sizeType: ['original', 'compressed'],
      //可以指定来源是相册还是相机, 默认二者都有
      sourceType: [type],
      success: function (res) {
        wx.showToast({
          title: '正在上传...',
          icon: "loading",
          mask: true,
          duration: 1000
        })
        // 返回选定照片的本地文件路径列表,tempFilePaths可以作为img标签的scr属性显示图片
        var imgList = res.tempFilePaths
        let tempFilePathsImg = _this.data.imgList
        // 获取当前已上传的图片的数组
        var tempFilePathsImgs = tempFilePathsImg.concat(imgList);
        _this.setData({
          imgList: tempFilePathsImgs,
          picturesNoteFlag: tempFilePathsImgs.length === 0
        })
      },
      fail: function () {
        wx.showToast({
          title: '图片上传失败',
          icon: 'none'
        })
        return;
      }
    })
  },
  // 点击删除
  deleteImg: function (e) {
    var _this = this;
    var imgList = _this.data.imgList;
    //获取当前点击图片下标
    var index = e.currentTarget.dataset.index;
    wx.showModal({
      title: '提示',
      content: '确认要删除该图片吗?',
      success: function (res) {
        if (res.confirm) {
          imgList.splice(index, 1);
        } else if (res.cancel) {
          return false
        }
        var picturesNoteFlag = (imgList.length === 0);
        _this.setData({
          imgList: imgList,
          picturesNoteFlag: picturesNoteFlag
        })
      }
    })
  },
  ...... 省略原生代码
})
描述
我们看到,用到了 view 和 imgae 两个组件。通过对图片的布局,js 函数的处理,来触发照片的上传和删除。
效果

总结
我们可以通过 image 组件对图片进行添加和删除操作。通过微信小程序自带的 bindtap 函数来进行把控。让用户感受到了添加和删除图片的效果。


